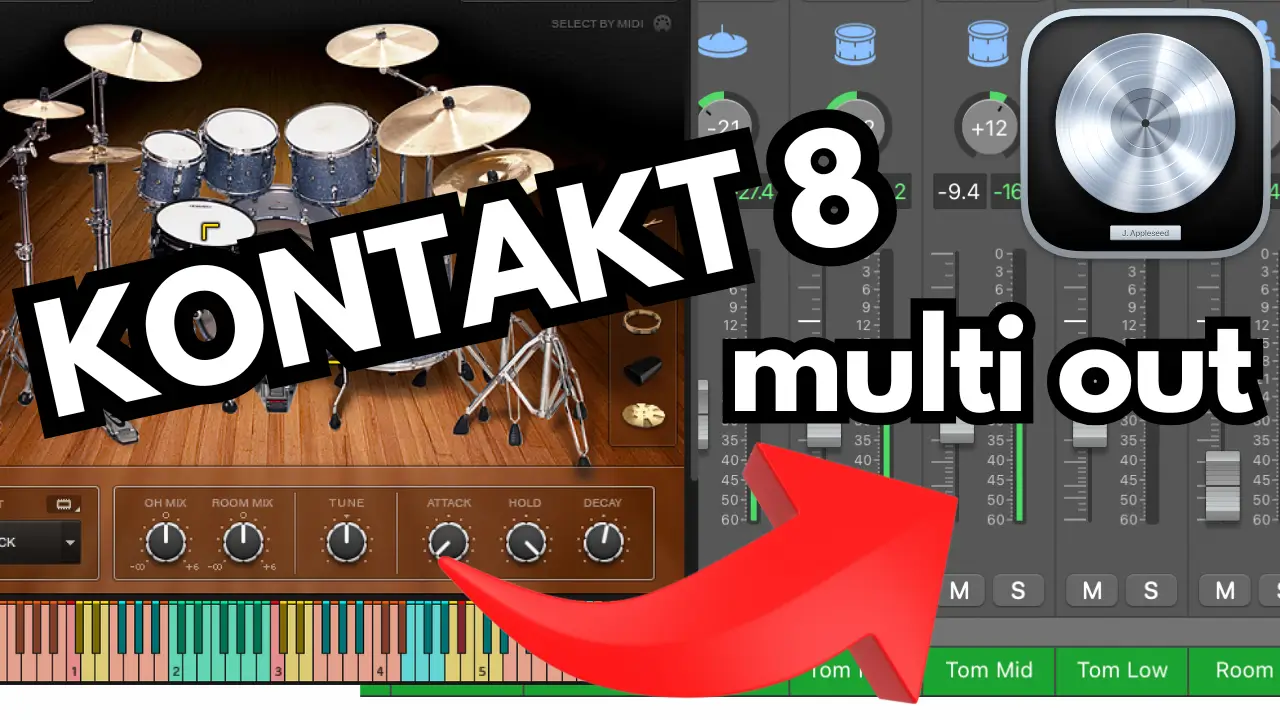
Are you struggling to set up multiple outputs for Kontakt 8 in Logic Pro? If you’re working with multiple instruments inside Kontakt and want to mix them independently, multi-output routing is essential. In this guide, I’ll show you exactly how to do it—step by step!
🚀 Watch the full tutorial here:
What to see the latest deals for native instruments plug-ins? Check out the complete list here.
Related Posts:
- How to Set Up Triaz Drum Machine Multi-Output in Logic Pro (Step-by-Step Guide)
- How to Set Up NI Battery Multi-Outputs in Logic Pro (Step-by-Step Guide)
- How To Set Up Multi-Output for EZ Drummer in Logic Pro
Why Use Multiple Outputs in Kontakt 8?
Kontakt 8 is one of the most powerful sampler plugins available, but if you only use it on a single stereo output, you’re missing out on total control over your mix. With multi-output routing, you can:
✅ Mix each instrument separately
✅ Apply unique effects to different sounds
✅ EQ individual elements for a cleaner mix
✅ Achieve a professional, polished sound
Now, let’s dive into the setup!
Step 1: Enable Multiple Outputs in Kontakt 8
- Open Kontakt 8 in Logic Pro.
- Click on the Output Section at the bottom. If it’s not visible, click “View” → “Outputs” in Kontakt.
- Click the “+” button to add new output channels.
- Set the number of stereo outputs you need (e.g., 8 stereo outs for a drum kit).
- Click “Apply” and save your output settings as default if you plan to use this setup often.
🔹 Pro Tip: Name your outputs (e.g., “Kick,” “Snare,” “Piano”) to stay organized!
Step 2: Route Each Kontakt Instrument to a Separate Output
- Load multiple instruments inside Kontakt 8.
- Click on the gear icon next to each instrument.
- Select the corresponding output channel you created in Step 1.
- Now, each instrument will have its own dedicated mixer channel in Logic Pro!
Step 3: Configure Logic Pro for Multi-Output Routing
- In Logic Pro, open the Mixer (Press
Xon your keyboard). - Find the Kontakt 8 instance and click the small “+” button to create additional aux tracks.
- Assign each aux track to match the outputs set in Kontakt (e.g., Aux 1 = Out 1/2, Aux 2 = Out 3/4, etc.).
- Rename the tracks for better organization.
💡 Now, each Kontakt instrument will have separate volume, EQ, and effects control inside Logic Pro’s mixer!
Final Touch: Mixing & Effects
With everything routed properly, you can now:
🎛️ Apply EQ, compression, and effects on individual instruments
🎹 Pan each instrument for a wider stereo mix
🔥 Process drums, pianos, and synths independently for a professional sound
Conclusion
Setting up multiple outputs for Kontakt 8 in Logic Pro may seem tricky at first, but once you do it, your mixing workflow will improve dramatically! By following this guide, you now have the freedom to control and process each instrument separately—just like a pro.
📢 Did this guide help you? Drop a comment below and let me know how you set up your Kontakt workflow!
🎥 Watch the full tutorial for a step-by-step demonstration!
(Embed your video here)
💡 Want more Logic Pro & Kontakt tips? Subscribe to my YouTube channel and stay updated with the latest music production tricks!
👉 Related Posts:
- How To Set Up Multi-Output For Addictive Drums in Logic Pro
- Vintage Dry ADpak Addictive Drums Expansion Drum Kit Review
🔎 Keywords: Kontakt 8 multiple outputs, Kontakt routing Logic Pro, multi-output setup, Logic Pro tutorial, Kontakt 8 mix setup, how to separate Kontakt instruments, Logic Pro multi-output routing.
Over 4 Million Sounds
Turn samples into songs with a versatile plugin suite. Loopcloud DRUM and Loopcloud PLAY craft pro‑quality beats and melodies that sound like you, and no one else.